

Cloudflare is a content delivery network. It acts as a middle layer between the visitor and the actual hosting provider. With Cloudflare installed your site will experience improvement in performance, have accurate site analytics, great spam protection, and much more. These are some of the main reasons why site owners choose Cloudflare over other networks and most probably you are one of them. If you are looking for detailed steps on the setup of Cloudflare with WordPress then we are here to help you.
Follow along and you will leave with a perfect set up.
How Does Cloudflare work with DNS?
Before installing Cloudflare you must know the working of it. Domain Name System (DNS) is basically the phonebook of the Internet. It translates your domain name to IP address so that your browser can load Internet resources.
To route traffic, DNS makes use of nameservers that is a collection of records. These records are in the form of IP addresses of your domains and subdomain (A). It specifies email delivery location (MX) and sets up redirects between different subdomains (CNAME), and also stores additional information (TXT). Cloudflare inserts itself as the nameservers of your domain so that it can handle the routing of your site’s traffic.
Also read: Which Are the 6 Best Web Hosting For Small Businesses?
Which means it has the IP Address of your domains and sub-domains and does all those activities specified above.
How to Setup Cloudflare with WordPress Website in Easy Steps
Step #1: Begin with Cloudflare Sign up Process
To use Cloudflare, you have to create an account on the website. Just type Cloudflare.com to visit the website. Once the page opens, look for the signup option. It will take you to the registration page.
Now, enter your email address and set a password. Make sure, you agree to the terms, privacy policy, and cookies policy to proceed further. Click on the create account button to finish the process.
If your email address is correct and the password follows the required criteria your account will be created immediately.
Step #2: Adding Your WordPress Website To Cloudflare
Once the registration is successful, Cloudflare will prompt you to add your website.
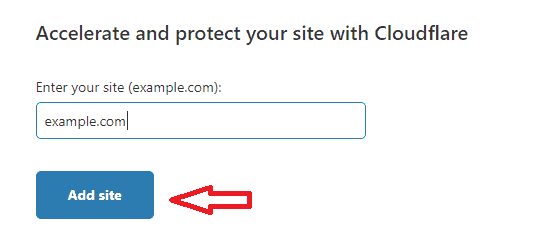
All you have to do is copy your domain name and add it to the domain name tab in front of you. Once you submit your domain name it’s time for the Cloudflare to scan your website’s DNS.
Meanwhile, you can watch the informative video on Cloudflare that explains this process in detail. Once the scanning is complete you can proceed further.
Step #3: Choose Your Cloudflare Subscription
Whether you are a beginner who is just trying his or her hands on the Cloudflare network or a professional with experience, there is a plan for each one of you.
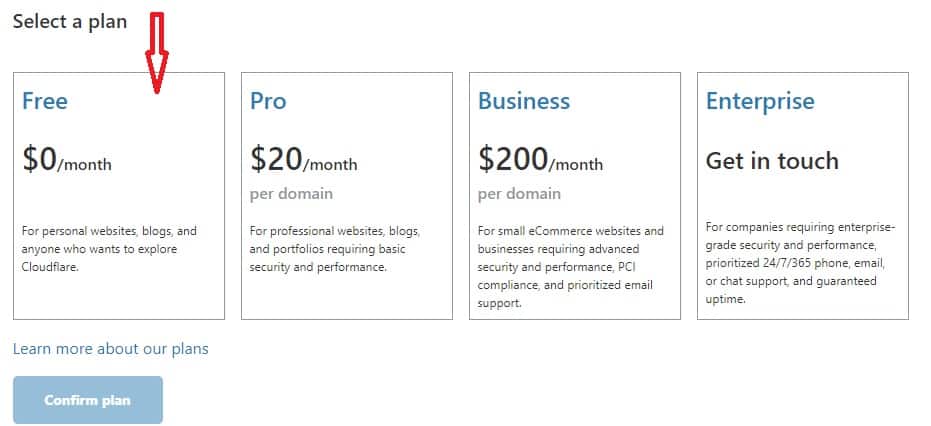
For beginners, it is highly recommended that they go for a free plan so that they get familiar with its features, advantages, and disadvantages.
Later on, based on your needs, you can switch to a professional, business, or any other plan. The plans vary from a few hundred dollars to thousands based on the service they offer.
Step #4: Time for DNS Records Confirmation
Cloudflare offers two options for you. One is to use their DNS or go for the CDN and protection option.
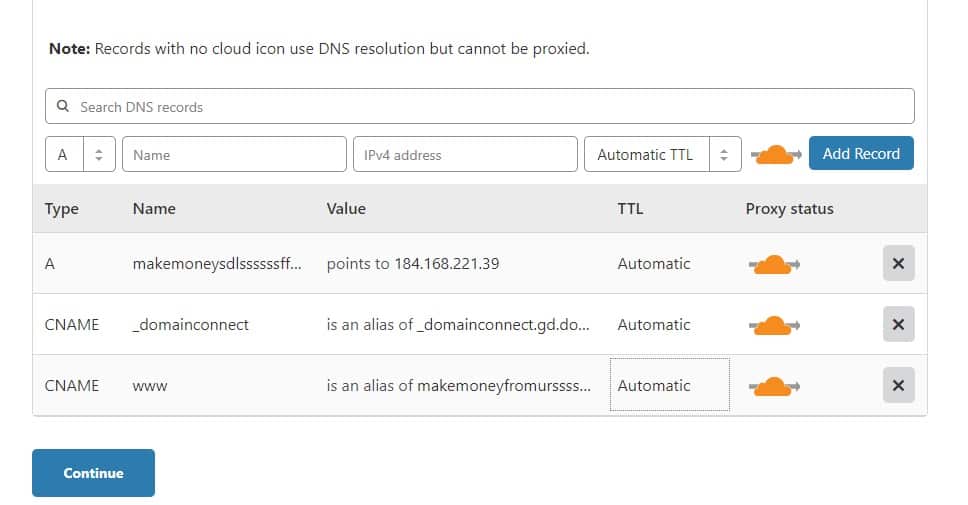
The latter has more benefits involved so most of the users go for it. If you want to confirm whether your domain is enabled or not then you can check the cloud icon. It will change to orange color.
At this point in time, you can continue with the further process or make other changes. Experts usually need to change the MX record for their email and check their subdomains too before proceeding further.
Step #5: Switch to Cloudflare’s nameserver
This is the final step before you begin integrating Cloudflare with WordPress. It’s time to switch your nameservers to Cloudflare ones.
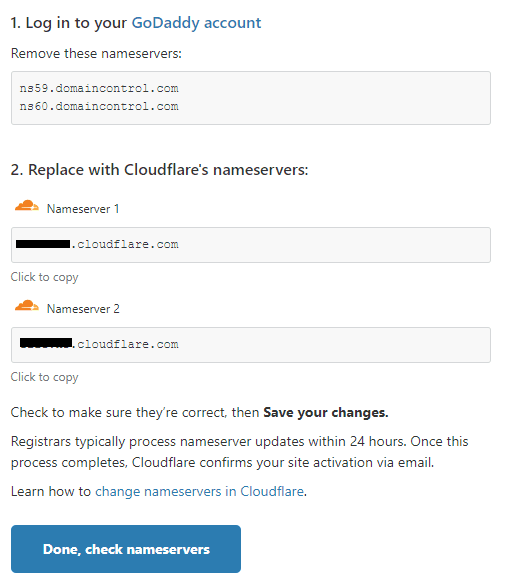
Navigate to the site where you registered your domain name example GoDaddy or NameCheap and make changes according to the values provided by Cloudflare. Different registrars use different processes so you can consult your registrar’s support team to guide you on the same.
After that, continue with the process on your Cloudflare account. After the successful completion of the process, you will get access to the full Cloudflare dashboard.
Step #6: Activating the Cloudflare Plugin
Login to your WordPress website and search for Cloudflare plugin. Install and activate it.
Navigate to the settings section on your WordPress dashboard and click on Cloudflare. You will be prompted to enter your email address and API key.
Also read: List of Best free Web Hosting Providers
Now, go back to your Cloudflare dashboard on your browser and check your profile details. On the My Profile page, search for the API key section. Copy the API key and paste it on the WordPress dashboard.
Step #7: Optimize The Settings
Once you login through the WordPress dashboard you will come across various new functions. One of the best function is the Optimize Cloudflare for WordPress one. It works like magic for beginners.
All you need to do is click on the option. Cloudflare will go through your WordPress settings and make optimal changes.
Step #8: Some Additional Optional Settings
Some people like to customize the Cloudflare configuration according to their needs. Configure your SSL connection to full, flexible, full with restriction, or off settings. This will configure the traffic’s security.
You can even make all the pages of your website’s to follow HTTPS rule and exclude the specific URLs from Cloudflare.
If we will start elaborating on the various options available on Cloudflare then there is no end to it. It totally depends on the plan you choose and the settings you want to impose on your WordPress website.
Final Thoughts
We hope our article was useful to you. We have shared the steps with complete details for you so that along with following them you understand them too. It is very important for you to understand how Cloudflare works so that you can personalize the network according to your needs. Cloudflare has a lot more to offer then you may ever imagine.
Also read: How to Make Money With a WordPress Blog
The features like web application firewalls, setting page rules, authentication, and rate-limiting are amazing. Once you will start using this network, you will be amazed by its features and keep on using it for your various WordPress websites.
If you find these steps helpful then do share your feedback. Also, feel free to ask queries on the setup process in the form of comments. We will answer asap.


